 Skip to main content

How Helical Piers Are Installed: Step-by-Step
Helical piers are screwed deep into load-bearing soil with a hydraulic drive head, then bolted to your footing with steel brackets. Here is the whole process, start to finish.
Helical piers are installed by digging a small pit at your foundation’s footing, bolting a steel bracket to it, and screwing steel pier sections into the soil with a hydraulic drive head until torque readings confirm load-bearing ground. The foundation’s weight is then transferred to the piers. Most Shreveport homes are done in one to three days.
What a Helical Pier Is, in Plain English
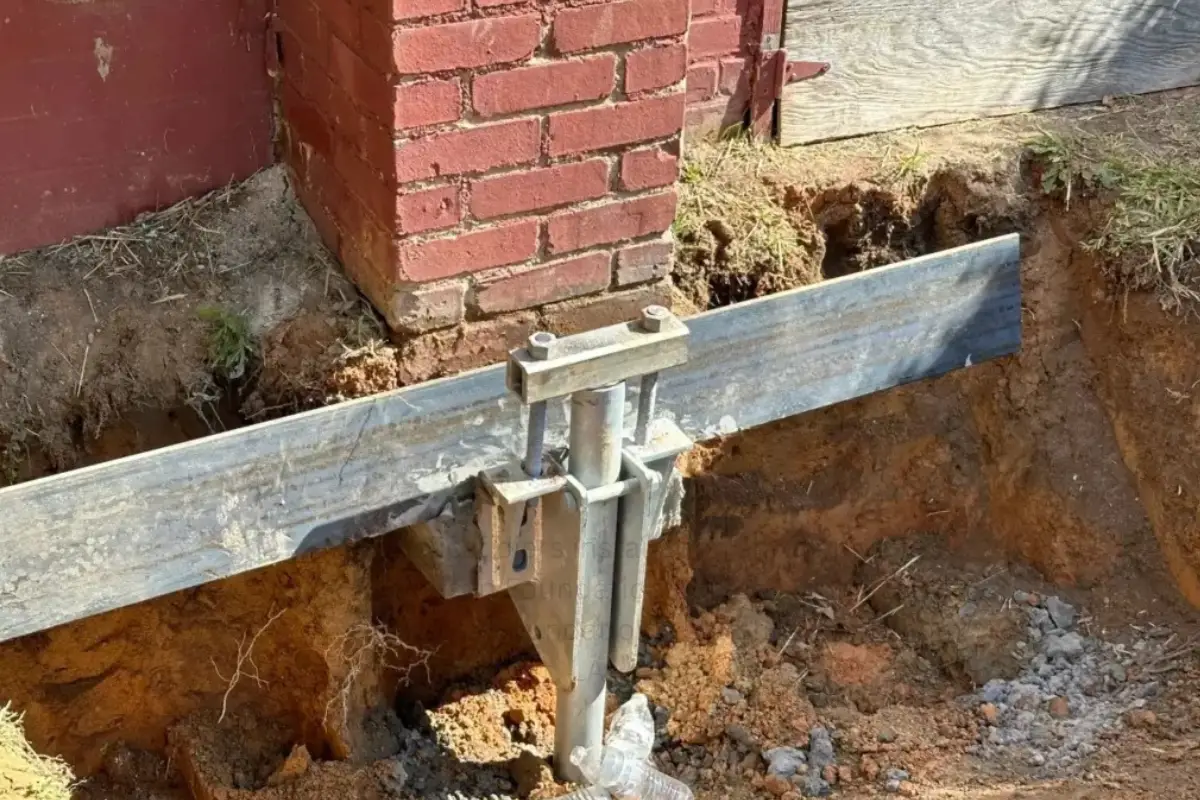
A helical pier looks like an oversized steel screw, and that is basically what it is: a steel shaft with one or more helix plates welded near the tip. As the shaft turns, the plates bite into the soil and pull the pier downward, the way a wood screw pulls itself into a board. No pounding, no jackhammering, just steady rotation.
The idea is simple. Instead of resting your home on the same restless clay that is already moving, you drive a steel column down past the active zone to soil that stays put through wet springs and dry Augusts. Each pier gets a steel bracket bolted to your concrete footing, and your home’s weight travels down the footing, through the bracket, down the pier, and out into stable soil. Clean chain, every link visible during the job.
The parts you are paying for
- Shaft and helix sections. Galvanized steel in five- or seven-foot lengths, threaded together as the pier goes deeper. Helix plate size is matched to your soil and the load each pier carries.
- The bracket. A heavy steel retrofit bracket bolted to the face of your footing. It is where your house meets the pier, and the most critical hardware on the job.
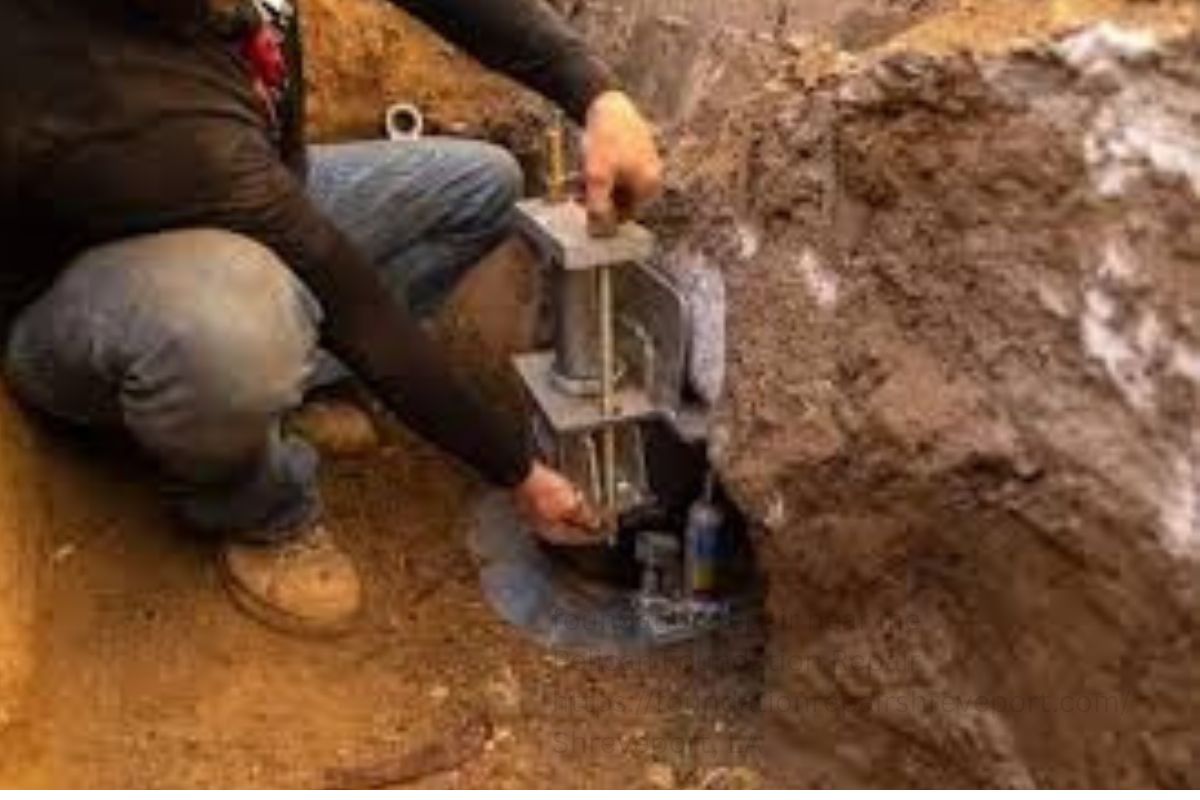
- The torque reading. The drive head measures resistance as the pier turns. That number proves the pier is in soil strong enough to hold its share of your home, and it gets logged for every pier.
Why torque matters more than depth
Depth alone does not tell you much. A pier at eighteen feet in dense soil can carry more than a pier at thirty feet in mush. Torque measures the resistance the pier met on the way down, and the crew does not stop until the gauge reaches the engineer’s target and holds. That reading is the closest thing foundation repair has to a receipt: proof each pier is doing its share before it carries a single pound.
Step 1: Inspection, Soil Clues, and the Plan
Nothing gets dug until the movement is measured. The job starts with an elevation survey, readings taken at a dozen or more points around the foundation and sketched on a simple floor plan. A quarter inch here, an inch and a half there — the pattern tells the story of where the house has settled and how far it has gone.
The inspector also walks the property: sticking doors, cracked drywall, stair-step brick cracks, a chimney pulling away. In Shreveport neighborhoods like Broadmoor and South Highlands, the damage often follows the sun, worse on the south and west walls that dry fastest. Full geotechnical drilling is rare for residential work; an experienced crew reads the local soil instead. Much of Caddo Parish sits on expansive clay, with softer alluvial soils near the Red River and a higher water table toward Cross Lake and Mooringsport. The pier plan — depths, spacing, helix sizes — is drawn from all of this.
Before digging, utilities get marked through Louisiana 811: gas, electric, water, sewer, cable. The crew also plans access. Can a mini-excavator reach the work areas, or will the pits be hand-dug? On tight lots in Highland or Cedar Grove, hand-digging along part of the perimeter is common. The whole plan is set before the first shovel hits dirt.
Steps 2 and 3: Excavation and the Bracket
Install day starts with digging. At each pier location the crew opens a pit about three feet square, straight down until the bottom of the footing is fully exposed — usually two to four feet on Shreveport homes. Dirt goes on tarps beside the hole, not across the lawn. It is the messiest the job gets, and it is still far tidier than most people expect: no long trenches, no torn-up driveway, just a series of small, contained digs.
With the footing exposed, the crew bolts on the retrofit bracket: a heavy steel assembly fastened to the vertical face of the concrete with expansion anchors. It has to sit flat against solid concrete, and the sleeve the pier passes through must be plumb, because a bracket set crooked now means a pier fighting sideways forces for decades. Sometimes a small notch is cut in the footing edge for a clean seat. Routine work, a few minutes with a concrete saw.
Smaller holes than you are imagining
A typical home needs eight to twenty piers, each with its own pit, and the crew usually works two or three at a time. Landscaping takes some bruising right at the foundation line, but shrubs a few feet out generally survive, and sod recovers within a season. Piers go in vertical in the vast majority of cases; an angled pier is an engineered exception, noted on the job record, not a shortcut.
Step 4: Driving the Pier With the Hydraulic Head
This is what makes helical piers different from every other method. The crew clamps a hydraulic drive head onto the first pier section and rotates it at just five to ten revolutions per minute, screwing it into the ground. Your pictures stay on the walls. As each section disappears, the next one is threaded on, five feet at a time, down through the soft surface clays and old builder’s fill into denser native soil. Near the Red River, where alluvial soils run deep, the pier keeps threading down. On higher ground like Shreve Island, it may find bearing sooner. The soil decides.
The operator watches the torque gauge the whole way. Steady rotation with climbing torque is the ideal picture — helix plates biting into progressively stronger ground. A sudden spike means rock or buried concrete, and the crew adjusts rather than forcing it. Most residential piers here land in the twenty-to-thirty-foot range, but the number that matters is on the gauge, not the tape measure. When torque reaches the engineer’s target and holds, the pier is done. Industry guidance on foundation work, such as InterNACHI’s foundation inspection resources, stresses exactly this kind of documented, verifiable installation.
Step 5: Putting Your Home’s Weight on the Piers
With every pier driven and verified, a hydraulic jack goes on top of each shaft, pushing up against the bracket bolted to your footing. Working in a planned sequence, the crew transfers the foundation’s weight off the weak surface soil and onto the steel columns below. If the plan calls for a lift, this is when it happens: slow, a fraction of an inch at a time, while the crew watches the elevation readings. You may hear popping and creaking inside. That is normal — decades of settlement reversing in an afternoon.
Not every job includes a lift. Many are stabilization-only: the piers take the load and lock the foundation exactly where it sits. When a lift does happen, the goal is functional recovery, not perfection — a slab that dropped two inches might come back an inch and a half, and the rest is left alone rather than risk cracking finishes. Then each pier is locked off: heavy nuts tightened on the bracket assembly, excess shaft cut flush, final elevations recorded for your documentation.
Step 6: Backfill, Cleanup, and What It Feels Like
The pits are backfilled with the excavated soil, compacted in layers so the ground does not slump later, and mounded slightly to allow for settling. A sloppy backfill leaves a low spot against the foundation where water collects in the next downpour, so good crews take this step seriously. Then the crew chief walks the perimeter with you, shows each pier location, explains the final readings, and hands over the job file: pier count, depths, torque readings, and warranty paperwork.
Most homeowners are surprised how livable the process is. You do not move out; water and power stay on. The loudest it gets is the hydraulic power unit, about as loud as a running mower. Here is the realistic timeline:
| Phase | Typical Timing | What You Will Notice |
|---|---|---|
| Inspection and utility marking | 1–3 days before install | Small flags in the yard; a 30–60 minute walk-through |
| Excavation and brackets | Day 1 | Digging sounds and foot traffic around the perimeter |
| Pier driving | Day 1–2 | A steady hydraulic whine; mild vibration |
| Load transfer and lift | Day 2–3 | Occasional popping or creaking inside the house |
| Backfill and cleanup | Final day | Yard restored; walk-through with the crew chief |
One practical tip: clear everything stored against the house before day one — patio furniture, pots, grills — and leave the fence gate unlocked if equipment needs it. And have a plan for the dog. The strangers, digging, and equipment noise stress some pets out.
Is Your Home a Good Candidate?
Helical piers shine in exactly the conditions Shreveport hands us: deep active clay and a restless water table. Talk to a foundation specialist if you are seeing stair-step brick cracks that widen every summer, doors that stick in dry months, a chimney pulling away, sloping floors, or old slab repairs that have started moving again.
To go deeper, read our helical pier installation service page, including when piers beat other methods. Homeowners usually ask next how deep helical piers go in local soils and what helical pier installation costs in the Shreveport area. Our services overview compares every foundation repair method side by side, and the U.S. Geological Survey documents the expansive-clay geology behind the movement for the curious.
Frequently Asked Questions
How long does it take to install helical piers?
Most residential jobs in Shreveport take one to three days. A straightforward eight-pier stabilization can finish in a day; larger jobs with twenty-plus piers, a lift, or hand-dig access may run three. Heavy rain can add a day if excavations flood.
Will the installation tear up my yard?
Far less than people fear. Each pier needs only a pit about three feet square at the foundation line. No trenches, no equipment crossing the lawn in most cases. Expect bruised grass at the foundation line and minor backfill settling over the first rainy season.
Can helical piers be installed when it is raining?
Light rain is fine, but heavy Gulf storms can pause the work. Flooded excavations are unsafe and muddy the torque readings, so crews wait out the worst of it. Spring storm season sometimes stretches a two-day job to three.
Do helical piers work in Shreveport’s clay soil?
They are one of the best answers for it. Our expansive clay moves with moisture, which defeats shallow repairs. Helical piers bypass the active clay zone and bear in deeper, stable soil that does not swell and shrink with the seasons.
How much does helical pier installation cost in Shreveport?
Most homeowners land in the low-to-mid five figures for a full perimeter job, driven by pier count, depth, and whether a lift is included. Per-pier pricing typically runs a few thousand dollars installed. An honest quote follows an elevation survey, never a phone guess.
Will my house actually be lifted?
Only if the plan calls for it. Many jobs are stabilization-only: the piers take the load and lock the foundation where it sits. When settlement has caused real damage, a slow, measured lift brings the structure back toward level, stopping at the safe target.
How long do helical piers last?
They are galvanized or coated steel seated in stable, undisturbed soil, independent of the surface conditions that caused the settlement. Our qualifying installations carry a 20-year structural warranty, and the steel is rated for a service life measured in decades.
Pelican Foundation Repair
6118 Fairfield Ave, Shreveport, LA 71106, USA
318-585-2003
https://foundationrepairshreveport.com/